Hello Honey Wall Hanger
Welcome to Janet’s Craft Corner! Today, we’re diving into a delightful DIY project that’s perfect for spring and summer decorating—the Hello Honey Wall Hanger. This charming piece features a whimsical honeycomb and bee design that adds a touch of seasonal warmth to any space. Whether you’re a seasoned crafter or a beginner, this project is sure to bring joy and creativity into your home. Let’s get started!

What You’ll Need
Before we jump into the crafting process, let’s gather all the supplies you’ll need to create your Hello Honey Wall Hanger:
- Hello Honey Wall Hanger Wood Cutouts
- Paint Colors:
- FolkArt Multi-Surface Paint in Titanium White
- Pure Black
- Moon Yellow
- Ocean View
- Apple Red
- Art Institute Precision Craft Glue
- Twine
- Ribbon of your choice

With these supplies in hand, you’re ready to create a beautiful piece of art for your home!
Preparing Your Workspace
Before you start painting, it’s essential to set up a clean and organized workspace. Here are some tips to ensure a smooth crafting experience:
- Choose a well-lit area to work in.
- Cover your work surface with newspaper or a plastic sheet to protect it from paint spills.
- Have all your supplies within reach to avoid interruptions.
Once your workspace is ready, let’s move on to sorting the pieces!
Sorting Your Pieces
To make the painting process easier, it’s helpful to sort your wood cutouts by color. Here’s how to do it:
- Gold Pieces: Honeycomb, border, “Hello,” honey drops, and bee stripes.
- White Pieces: Flower, flower petals, and bee wings.
- Black Pieces: The bee itself.
- Red Pieces: The heart on the bee.
By organizing your pieces, you’ll streamline the painting process and ensure that you don’t miss any parts!

Painting the Base
Now that everything is sorted, it’s time to start painting! We’ll begin with the base of the wall hanger. Here’s how to do it:
- For the background, I’m using a faux stained technique. You can choose any color you like, but I recommend using Burnt Umber for a rich, warm look.
- Using a wet wipe, dip it into the paint and apply it to the board, starting from the center and working your way outwards.
- Make sure to cover both the top and bottom parts of the board.
Remember, you can also opt for a solid black background if you prefer a more classic look!

Applying White Paint
Once the base is painted, it’s time to apply the first coat of white paint. Here’s how:
- Use a sponge to apply the white paint to the flower and flower petals. This method helps to avoid filling in the holes and keeps the texture intact.
- For larger pieces, like the bee wings, you can use a brush for a thicker application.
- Don’t forget that white often requires a second coat, so be prepared to go back and touch up!

Painting the Gold Accents
Next, we’ll move on to the gold accents. Here’s how to achieve a beautiful gold finish:
- Using a sponge, apply the gold paint to the honeycomb, border, and other gold pieces.
- Since gold can sometimes require multiple coats, keep an eye on the coverage and be ready to apply a second layer if needed.

Adding the Final Touches
Now that the main pieces are painted, it’s time to add the final touches:
- Paint the bee with black paint, ensuring to cover all edges for a clean look.
- Use the red paint for the heart on the bee.
- Once everything is dry, you can start assembling your pieces!
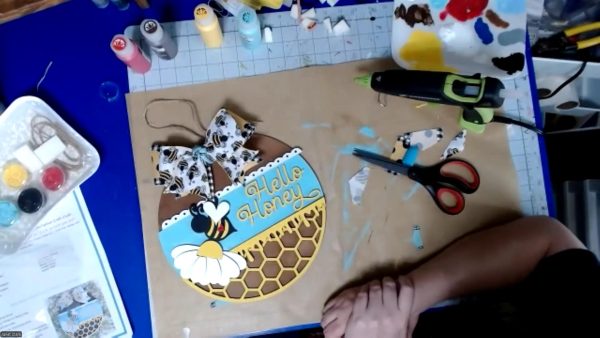
Assembling Your Wall Hanger
Now comes the fun part—putting everything together! Here’s how to assemble your Hello Honey Wall Hanger:
- Start by placing the honeycomb at the bottom of the board, ensuring it aligns with the edges.
- Layer the teal piece on top, followed by the white lacy piece.
- Position the flower and bee, making sure they complement each other.
- Finally, add the honey drips and the “Hello Honey” text, ensuring everything is aligned properly.

Once you’re satisfied with the arrangement, use your Art Institute Precision Craft Glue to secure everything in place.
Finishing Touches
After assembling your wall hanger, it’s time to add some finishing touches:
- Consider adding twine or ribbon for hanging.
- Use a paint pen to add any additional details or highlights.
- Let everything dry completely before displaying your new creation!
Display Your Creation
Your Hello Honey Wall Hanger is now complete! Here are some ideas for displaying it:
- Hang it on your front door as a cheerful welcome sign.
- Display it in your kitchen or dining area for a touch of whimsy.
- Use it as part of your seasonal décor for spring and summer.
Wherever you choose to display it, this wall hanger is sure to bring a smile to everyone who sees it!
Join Us for More Crafting Fun!
Thank you for joining me in this crafting adventure! I hope you enjoyed making the Hello Honey Wall Hanger as much as I did. Be sure to check out more easy-to-make DIY craft kits in our shop and follow me on social media for more creative inspiration:
If you have any questions or need assistance, feel free to reach out to me at janet@janetscraftcorner.com. Happy crafting!